
And red and yellow fun it brings,
Tu-torial of Polymer Clay -
Oh, show me how to make a cane!
Did you ever wonder how the picture gets into one of those little, flat beads? I know that I did, and so I did some research and learned also how to make picture beads myself!
So much to share today, and so many pictures, bear with me folks! Later on, there will be a little (read: few words, many pictures!) tutorial on how I made a Christmas Tree cane of polymer clay, which I then cut into beads for use on my Row Counters!
But first, as promised last time, Sock Pattern and Yarn Review #2:
In February, I pulled Edwardian Boating Socks out of my bin for my February Socks! The yarn is 5th Avenue Funky Sock Yarn, by Herrshners, and I had only one problem with this yarn, as it was not what I expected it to be. On the website, it stated that the yarn was wool/nylon, but when I read the label, it said Acrylic/nylon. . .that's a big difference. Some people really don't like to knit/wear socks in acrylic, and I confess that I am (at times) one of them. I guess you can't beat the big A for sturdiness and easy care (don't even think about bringing an iron into the room), but it does not breathe well, and is better suited to slippers and house-socks than inside-a-shoe socks. . .especially in warm weather! Still, the colors were good, and they played together nicely to make this pattern really sing:
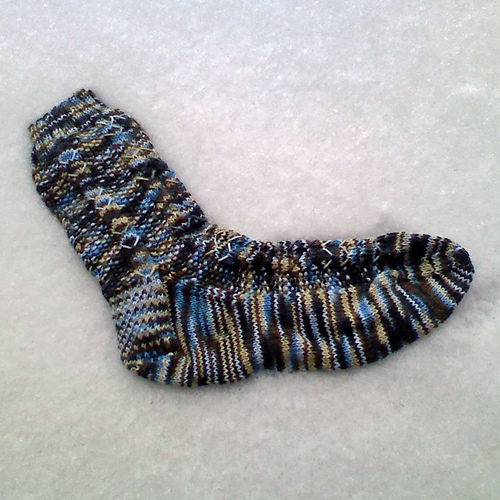 By the way, I love the way this pattern knits and looks, but I learned (the hard way because I never tried it on as I went) that the linen stitch panels killed the elasticity of the thing, so that I couldn't even think about putting it over my foot without a re-do! I ended up knitting those panels in seed stitch, and ultimately the socks fit. . .but I gave them to College Girl anyway. . .I am a sucker for a teenager who loves hand-knit socks!
Overall, these socks are a good bet. :o) The pattern is well written and pretty, but remember to add stitches to your regular size in this pattern OR change the stitch on the plain panels to skip the inelastic linen stitch! I probably won't buy the yarn again for socks, though I might get some for other things.
And now, on with the Tu-torial!!! It's not all-inclusive, and there are many ways to build a Millefiori-style "cane" with clay, some high-tech, some not. The following is just my low-tech take. If you are going to dive into the process, you might also check out some additional sites for more information, and refer to the use and baking instructions on whatever clay you are using. . .but this is how I turned this SculpeyIII clay:
 . . .into these beads!:
Creating Christmas Tree Beads in Polymer Clay
Disclaimer: Do not use any of your polymer clay tools/ovens for food once they have been used with polymer clay! Residue from the clay can remain even after cleaning/washing, and baking clay (even a little bit) at temperatures over the manufacturer's suggested baking temp can create toxic fumes.
Step 1: Start with clean everything to avoid accidentally mixing colors. Wiping with baby wipes will take the clay off of most surfaces.
Condition the clay, I use a pasta machine, set on the thickest setting at first. . .
 Then rolling it a little thinner and smoother as the clay gets softer. . .
 Until I can roll paper-thin sheets on the lowest setting. The clay is soft, shiny and smooth when it is ready. . .
 You can also condition the clay by simply working it in your hands, but I really love the results I get with the pasta roller. Bonus!, I don't need a rolling pin to create thin sheets!
Step 2: Once the clay is nice and soft, I divide it into small pieces which I then roll into 1/2" long tubes that I will use like Lite-Brite pegs to make a "picture" for the center of the cane:
 Here are all of my colors rolled into pieces. . .some are thicker and some are thinner. I don't know how many I will need when I start, so I just roll out what I think I might need for now. I can make more if I need to, and I can use leftovers for something else!
 Step 3: Stand the tubes up, and push them together to make a picture. . .in this case, a Christmas Tree for the holidays! My piece will be made up of several tubes of clay, and it will be about 1/2" thick everywhere because the clay tubes are all about the same length. There may be some tiny spaces, but these will be worked out when we "reduce" the cane's diameter.
 Step 4: Now, we need a background, so I roll out some pieces of the white clay to fit into the outside edges, and to help me create a round-ish piece from my triangular tree!
 Step 5: With some of my leftover clay, I make borders for the cane by putting the clay through the pasta machine again to make a 1/2"wide ribbon of clay for each border. For this cane, I want the green to be on the outside, so it's the last color I roll out to wrap around.
 Right now, this piece is about 3" in diameter, and about 1/2" thick. Now it's time to make my round slab of clay into a thin tube of magical beads!
 Step 6: The Magic Happens as I hold the slab in the curve of my hand, trying to maintain the flat edges, and I squish and squoosh and squash the clay, compressing it from the outside in. . .
 . . .working from the center of the forming tube toward the picture ends. . .I am not "rolling" the tube, like I did earlier with my tiny clay pieces, but carefully compressing it, as evenly as I can. . .
 . . .until the "picture" ends become distorted beyond recognition, and the tube is about 3/4-1" in diameter. Just keep squishing ("reducing") from all sides, gently and evenly. . .
 . . .until it the ends look something like this. Where did the Christmas Tree go???
 Step 7: Here comes the real magic. . .take a deep breath and swiftly cut the cane in the center with a very sharp blade to see the magic!
 Amazing, no?
Step 8: Now that the cane is so much thinner, you can squoosh a bit more, and cut off the bulky end. Then roll the tube out to be as thin as you like. Mine was about 1/4 - 1/2" in diameter. Then I let the thin tube rest for about 30 minutes before I used my sharp blade to cut the beads from the center of the cane.
Note: Anytime you roll the cane thinner, the ends will distort a bit, but you can cut these ugly pieces off and make colorful, spherical or oblong beads with them. Bonus!, these "leftovers" beads will match your cane beads perfectly!
 Step 9: After the beads are cut (about 1/8" thick), you can make a hole lengthwise with a pin or thin piece of wire for creating a charm later. Or, if you want buttons, you can make holes through the flat sides of the bead.
 Step 10: Then bake, according to the package instructions on the clay, approximately 15 minutes for every 1/4" of thickness in your pieces. Here are some of my beads, "skewered" and ready to be baked. On some of the canes, I added thin layers of red or yellow clay to the outer edge of the cane for a different look.
 After baking and cooling, here are my beads! I will seal them with a shiny or matte glaze, and make knitting jewelry from them. . .just like I did with my spider friends!!!
 Whew! That was a LOT of writing. Now, I think it's time to knit! I hope that you get some knitting and crafting time today. . .maybe you should try some polymer clay!
 Or you could just Knit in Good Health!




 Oh, and if I have the time, I am planning some Christmas canes for the shop as well, and I hope to be on the ball enough to take some photos and put up a quick tutorial on how it works. I know, there are many tuts on this already, but still it amazes me every time I make it work, and I can't help but believe that it will also amaze you! Sooo, prepare to be amazed, somewhere in the next week or two! haha!


 This knit goes on a baby head! It's the
 And this knit goes on me. . .eventually! lol It's the body of my
